You use web forms to collect information from website visitors. You can then view and analyze this information in the Web Forms for Marketers reports.
You can create a web form in the Experience Editor directly on your website.
There are two ways to create a form:
- Insert a ready-made web form
- Create a blank web form from scratch
Insert a ready-made web form
By default, there are six ready-made web form templates in the Web Forms for Marketers module:
- Create an Account
- Get Our Newsletter
- Pay with Credit Card
- Tell a Friend
- Demo Form
- Leave a Message
If the web form that you want to create is similar to one of these forms, insert a ready-made form and edit it. Otherwise, create a blank new form.
Note: If you are inserting forms in the Content Editor, you must create a form before you can add it to a layout.
To insert a web form from a template of an existing ready-made web form:
- In the Experience Editor, open the webpage that you want to add a web form to and on the Home tab, in the New group, click Component:

The Add here buttons appear on the web page:

2. In the place where you want to add your web form, click Add here. If your Sitecore administrator has restricted adding web forms to a placeholder, you cannot insert a web form into it.
3. In the Select a Rendering dialog box, click the Form rendering, and click Select

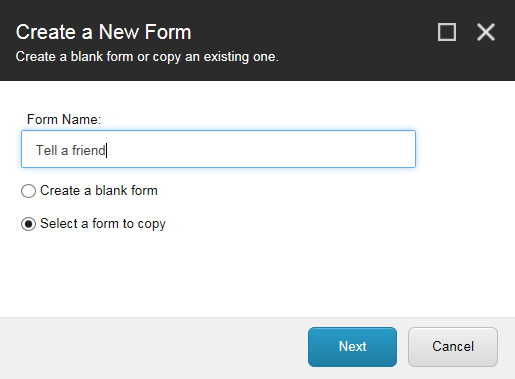
4. In the Create a New Form dialog box, enter a name for the form and to create a web form using the ready-made web form, select Select a form to copy and then click Next.
Note

5. In the Select a Form dialog box, select the form that you want to copy, and clickNext

6. In the Analytics dialog box, you can specify goals and enable form dropout tracking.

In the Goal section, you can either create a new goal and specify the engagement value for it or associate an existing goal with your form.
In the Dropout Tracking section, by selecting Enable Form Dropout Tracking, you make sure that all the information entered in this form is tracked. When this option is enabled all the data entered in this form is saved in the analytics database, regardless of whether the visitor completes the form or not.
7. Click Next and in the Confirmation dialog box that appears, verify your choices and, to insert the ready-made form, click Create.

The new form opens in the Form Designer.

8. In the Form Designer, either edit the form and then click Save or Save/Close or, if you have no further changes, click Close to close the Form Designer.
9. In the Experience Editor, click Save to save the form.
Create a blank web form from scratch
To create a new web form from scratch:
- In the Experience Editor, open the webpage that you want to add a web form to and on the Home tab, in the New group, click Component:

The Add here buttons appear on the web page:

2. In the place where you want to add your web form, click Add here. If your Sitecore administrator has restricted adding web forms to a placeholder, you cannot insert a web form into it.
3. In the Select a Rendering dialog box, click the Form rendering, and click Select.

4. In the Create a New Form dialog box, enter a name for the form and selectCreate a blank form, and then click Next.
Note

5. In the Analytics dialog box, you can specify goals and enable form dropout tracking.

6. In the Goal section, you can either create a new goal and specify the engagement value for it or associate an existing goal with your form.
- In the Dropout Tracking section, by selecting Enable Form Dropout Tracking, you make sure that all the information entered in this form is tracked. When this option is enabled all the data entered in this form is saved in the analytics database, regardless of whether the visitor completes the form or not.
- Click Next and in the Confirmation dialog box that appears, verify your choices and then to create the new form, click Create.

7. The new form opens in the Form Designer.

8. In the Form Designer, edit the form and then click Save or Save/Close to close the Form Designer.
9. On the Experience Editor ribbon, click Save to save the form.
Leave a comment